Because in the dry distillation wood for the first time found, it is also called "wood alcohol" or "wood essence".
It is a colorless volatile liquid with the odor of alcohol.
The lowest dose of oral poisoning in humans is about 100mg/kg body weight, and oral ingestion of 0.3 to 1g/kg can be lethal.
Used in the manufacture of formaldehyde and pesticides, and used as extraction agent of organic compounds and denaturing agent of alcohol, etc.
The finished product is usually made by reacting carbon monoxide with hydrogen.
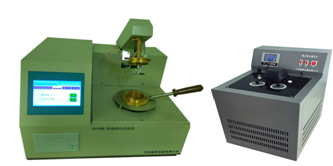
Methanol flash point can be measured by automatic low temperature closed flash point analyzer, namely SH105C low temperature closed flash point analyzer.
SH105C low temperature closed flash point meter is designed and manufactured in accordance with the requirements of the standard GB/T261-2008 of the People's Republic of China.
Instrument according to the standard method of heating, automatic rise and fall, automatic ventilation, automatic ignition, automatic display, automatic locking flash point value, automatic printing results.
After the test can be automatically cooled, to achieve the full automation of the work process.
It has the advantages of accurate measurement, good repeatability, stable performance and simple operation.
Widely used in electric power, petroleum, chemical, commodity inspection, scientific research and other departments.
In line with ISO - 2719,GB261 standards.
Instruments for the experiment
1.SH105C Automatic Low Temperature Closed Flashpoint Instrument, developed and produced by Shandong Shengtai Instrument Co., Ltd.
2. Low temperature closed flash point meter is equipped with low temperature circulation device.
3. Closed flash point special cup
Experimental steps:
First, preparation work
1. After the instrument is unpacked, please count the accessories according to the packing list. If there is any damage, please contact our company.
2. The instrument should be carried vertically, and the tilt Angle along the height of the instrument should not exceed 30 degrees. It should be placed in a dark place and placed smoothly, otherwise there will be vibration after the start of the instrument, which will affect the service life of the instrument.
3, the instrument power supply is connected to the capacity of more than 220V/10A socket, pay attention to must have a good grounding wire.
Second, the experimental process
1. After the power is switched on, the test arm of the instrument is automatically lifted to display the experimental interface.
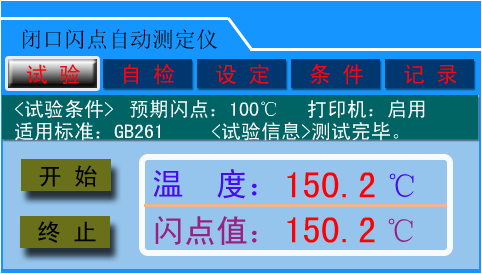
Click "Start", and the test arm falls down to start the test;
Click "Stop" to stop the test and lift the test arm.
The "Test Conditions" section shows the test setting conditions, including the expected flash point, printer switch Settings, and the standard applicable to the test.
The "Test Information" section displays the test progress information.
In the test interface, click "Self-test", "Settings", "Conditions", "Record" and other buttons to enter the corresponding functional interface.
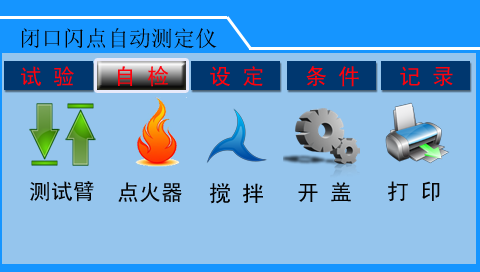
2. Self-check interface
Under this interface, self-check operation can be performed on each component of the instrument.
Click "Test Arm", the test arm component rises;
Click again and the test arm assembly falls.
Click "igniter", point the bright firearm;
Click again to extinguish the igniter.
Click "Stir" to start stirring.
Click again to turn off mixing.
Click "Open the lid" to start the sliding plate of the cup lid and automatically return to its position.
Click "Printer" to start the printer to print self-test. The printer will print the simulated test results (not the real test results) to verify whether the printer works normally.
During the self-test of each component, the corresponding operation information will be displayed below it.
3. Set the interface
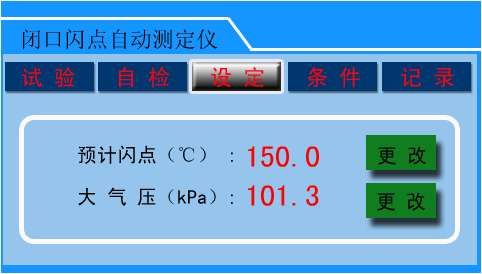
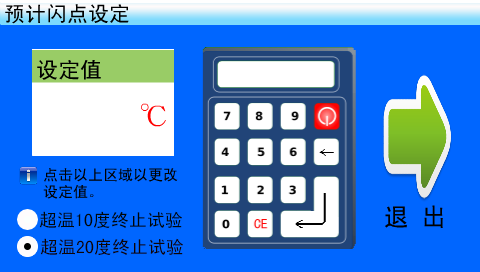
Under this interface, you can set the estimated flash point value and atmospheric pressure value. Click "Change" after "Estimated Flash Point" or "Atmospheric Pressure" to enter the interface for setting the estimated flash point or air pressure:
Expected flash point setting
